Layout, drawing and typography
Arrange panels, draw annotations, and control the details of a figure.
Everyday editing
Everywhere in Flux the pointer is a crosshair built to stay visible on any background — a white halo under a dark core, with a small gap at the centre so the exact pixel you are pointing at is never covered. Over anything you can click or select — a button, a layer, a swatch, an object — it gains an accent dot, and it tightens while you press. Text fields keep the I-beam; handles keep their resize arrows and pan keeps the hand.
Drag to move (with smart snapping and alignment guides), arrows to nudge, Alt+drag to duplicate, Shift+drag to constrain to an axis. To move something to a different figure, just drag it there: the figure under the pointer lights up, and releasing puts the selection into that figure where you dropped it (groups and panel captions come along; one Undo brings it back). Ctrl+X cuts, Ctrl+C copies and Ctrl+V pastes, so a cut in one figure and a paste in another is the keyboard way to do the same thing. Ctrl+G groups (Ctrl+Shift+G ungroups), ] brings to front and [ sends to back (with Ctrl they move one step), Shift+H / Shift+V flip, Delete removes, Escape cancels whatever you’re midway through. The Inspector’s Align row lines selections up, distributes them, and sets exact gaps.
The property menu
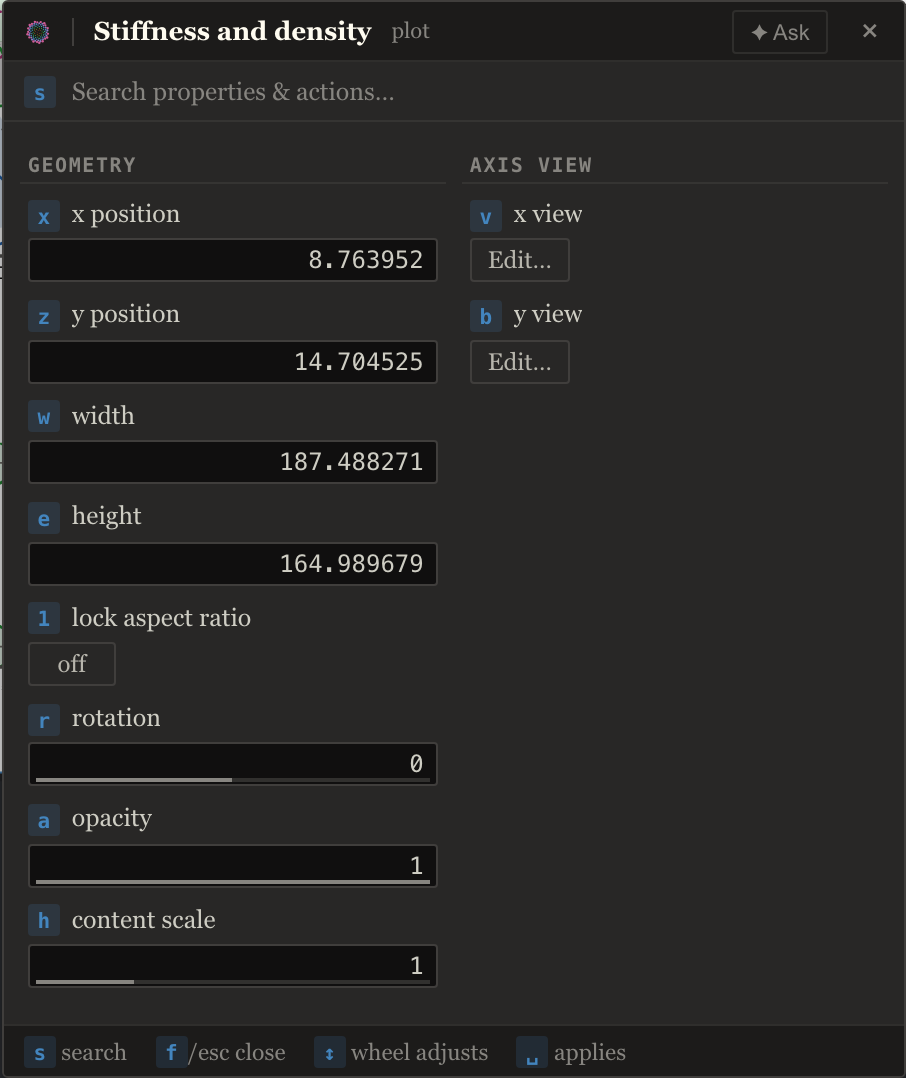
Press F with anything selected for the property menu, the fastest way to edit with one hand on the keyboard and one on the mouse. It opens beside the selection, never on top of it (when nothing fits, it takes the side that covers the least), and lays its groups out in narrow columns, each row a key and a name over its control, so nothing scrolls. Opening a larger picker repositions the menu when needed to keep the selection clear.
Every hotkey is a left-hand key: 1–6, q w e r t, a d g and z x c v b, plus h for a plot’s content scale or a text’s letter spacing and n for paragraph spacing. Your right hand stays on the mouse:
- Press the key to arm the row.
- Roll the mouse wheel anywhere on the screen to adjust it. A slow roll moves one step per notch, a flick moves fast and a trackpad scrubs; hold Shift for ×10 or Alt for ×0.1. ↑/↓ step too, and typed digits replace the value.
- Press Space or Enter to apply, or Escape to revert.
A choice such as font or alignment expands its options inline (wheel, w/a/s/d, 1–9, or click).
Hovering any numeric row and rolling the wheel edits it directly, so the menu works with the mouse alone as well; s searches the properties. It carries the essentials (position, size with aspect lock, rotation, opacity) plus the deep cuts: dashed strokes with dash/gap control, arrowheads on lines and open paths (filled or V-line, sized, with round/flat/square caps), corner radius on rectangles and paths, no-fill/no-stroke, separate fill opacity (b) and stroke opacity (t) — each independent of the object’s opacity, which multiplies both — text styling — and save as preset for anything you want to reuse. The right rail carries the same properties (fill, stroke and text colours with their palette names, sizes, stroke widths, arrowheads), so the menu is a choice, not a requirement.
Colours and colormaps
A colour row opens the palette — every row on one line, the whole grid in view — with the full spectrum beside it (a saturation/value square and a hue bar, seeded from the current colour), a hex field and an eyedropper; hovering a swatch previews it live, a click applies it, and a drag on the square previews until you let go. The hex field and spectrum follow the preview. The opacity slider under the spectrum is the picked paint’s own opacity — a fill picker sets the fill’s, a stroke picker the stroke’s (a text colour sets the object’s opacity) — and shows the selection’s current value (or mixed). Releasing the hue or opacity slider applies that adjustment and keeps the picker open so you can continue tuning the colour.
The eyedropper samples a colour from your screen. On Linux it uses your desktop’s colour picker; Escape cancels without changing your artwork. If screen picking is unavailable, Flux offers a magnified view labelled Pick from Flux window, which samples only this window. A completed pick is one undoable change. Escape or clicking outside dismisses an unchosen preview; an incomplete hex stays editable until you finish it.
The palette comes in collections — Flexoki (the default), ColorBrewer, Paul Tol’s colour sets, and your project’s own imported palette — as tabs above the grid; Shift+Tab cycles them. Tab switches the grid to the colormaps: every map fluxplot ships (matplotlib, Crameri’s Scientific colour maps, Paul Tol, cmasher), by collection and by type, each with a preview bar — pick a map and hover along its bar to take the colour at that position, r reverses it. Or take the whole map: x or y (or the along x / along y buttons under the bar) lays it across the element as a gradient along that axis — x left→right, y bottom→top — for a shape’s fill or stroke, a line’s or arrow’s stroke (arrowheads included), or a text’s glyphs. The map’s colours are stored on the element itself, so the gradient travels into every export (SVG, PNG, TIFF), headless render and exported deck exactly as drawn; the menu chip and the Inspector swatch show the map and name it (crameri.batlow · along y), and picking any plain swatch returns the element to a solid colour. Plot parts take solid colours only. Settings → Figure chooses which palette and colormap collection a picker opens on.
Numeric fields and layers
Numeric fields accept expressions such as 240/2 and display fractional values even when the normal wheel increment is a whole unit. Drag a field’s label to scrub, or click its input and type. A scrub or a continuous text/property edit is one undo step; Escape cancels the current preview. Mixed selections show Mixed and how many objects a property can change. Locked or hidden objects, including members of a locked or hidden group, stay unchanged while you edit the rest of a selection.
In Layers, Ctrl+click (⌘+click on macOS) toggles objects and Shift+click selects a range. With a row focused, ↑/↓ moves through the list, Home/End reaches either end, Shift+↑/↓ extends the selection, and F2 renames. A group opens or closes with →/←. Locks inherited from a parent group explain which group must be unlocked.
Resizing a figure
Click the figure’s title above its frame, then drag an edge or corner of the frame. The handles stay the same size on screen as you zoom. Shift preserves the frame’s original aspect ratio. The Inspector shows the new dimensions during the drag; Escape restores the original boundary, and a completed resize is one undo step.
Resizing the frame changes the export boundary. Your plots, text and shapes retain their size and world position. Moving a left or top edge moves the boundary around the artwork; elements and ruler guides adjust their local coordinates to stay in place. Artwork outside the new frame remains in the project and reappears if you enlarge the boundary again. Dragging the title still moves the whole figure. Slides use a shared deck stage size.
Resizing a plot and its content scale. Resizing a placed plot changes its axes and data area but keeps its text and line widths at their true point size, the way changing a figure’s size in matplotlib does. The Inspector’s Content scale (or the K scale tool) is the other dial: it makes the plot’s text and lines bigger or smaller inside the same box. Pictures that have no text or lines, such as a PNG saved inside an SVG, have nothing for content scale to change, so the Inspector says so instead of showing the field. Resize the box to make them bigger.
Drawing
The shape tools do what you expect; the pen (P) is placement-assisted: click to place points; a ring appears when you’re close enough to your first point to close the shape; Shift constrains segments to 0/45/90°; dashed guides snap to alignments with earlier nodes, and tick marks snap equal edge lengths — perfect squares and 45-45-90 triangles from sloppy clicks. Enter finishes an open curve; while the background grid is showing, the pen snaps to its vertices.
Double-click a path (or press Enter on it) to edit its nodes. Inside node-edit: v moves nodes (Shift+drag constrains along the axes or the flanking tangents), p continues drawing — connect to an endpoint to extend or merge the path — d deletes nodes, and Ctrl+drag on a segment bends it. The Inspector’s Closed path checkbox opens or closes any path.
Arranging text in its box
Press T, then either click for a label — the box hugs whatever you type on one line — or drag out a box for a paragraph: the text wraps at the width you drew and the box grows downward as you type. Every text box has a sizing mode you can change later — Auto hugs, Auto H wraps at the box width and grows downward, Fixed keeps both dimensions — and everything below arranges the text inside that box.
Align places the lines across the box: Left, Center, Right, or Justify. Justified text stretches every line out to both edges by widening the gaps between words — the letters keep their own spacing — and leaves the last line of each paragraph at its natural width, the way a printed column does. A line holding a single long word is left alone, since there is no gap to widen. It needs a width to fill, so choosing it on a hugging label turns the label’s current width into the box’s width (Auto H): nothing moves yet, but drag the box narrower — or keep typing — and the lines wrap and fill it.
Vertical places the block down the box: Top, Middle, or Bottom. The box itself never moves or changes size — only the text inside it does. There is nothing to see until the box is taller than the text, so this row appears with Fixed sizing (a hugging box is exactly as tall as its text). It is what lines a label up with the middle of the panel beside it.
Line height is the distance between lines, as a multiple of the font size (1.2 by default — 1.5 reads more airily, 1 sets the lines tight). Paragraph space adds extra room before each new paragraph, so you can separate paragraphs without leaving blank lines; it counts only where you pressed Enter, never between the lines of one wrapped paragraph. Tracking is letter spacing — the space added after every letter. Both are in points, like the font size, and a negative tracking pulls letters together. Tracking changes how much fits on a line, so a wrapping box re-wraps as you adjust it.
Italic for one word, not the whole box. Double-click the text to edit it, select the part you want — a species name, a gene symbol, a single letter — and press Ctrl+I, Ctrl+B or Ctrl+U. Only that stretch changes; the box keeps its own font, so the rest of the label is untouched. With nothing selected, while you are typing, the same keys style only what you type next: press Ctrl+I, type the species name, press Ctrl+I again and carry on upright. Moving the cursor or clicking ends that. To style the whole box, click the box without editing it, or select all of its text first.
The formatting sticks to the letters it was given: type in the middle of an italic word and the new letters are italic too, type against its edge and they are not, and deleting the word takes its formatting with it. The formatting shows on the canvas as you work. Bold makes letters wider, so after a bold word the text cursor can sit a few pixels off the letters. In the rare case where a bold word pushes text onto another line, the box shows plain text while you type, and the bold appears when you click away. (Escape throws the whole edit away, formatting included.)
Superscript and subscript. Select the characters and press Ctrl++ (superscript) or Ctrl+= (subscript), or use the Inspector’s X² and X₂ buttons. The characters are set smaller and raised or lowered, so x² and H₂O stay in one text box. Ctrl+. and Ctrl+, do the same, as in Google Docs. Pressing the same one again puts the characters back on the line, and with nothing selected it applies to what you type next, like the other styles.
Colour and the Inspector work on the selected letters too. While letters are selected, the Inspector’s Text section says Styling N selected characters. Its B, I and U buttons then format just those letters, and you can press several in a row. The Text colour swatch paints just those letters as well, so one symbol can be red inside a black label. Click Whole box, or click the canvas, to style the whole text again. A colormap gradient always covers the whole box, so it is not offered for a few selected letters.
All of these sit in the Inspector’s Text section and in the F menu, they apply to every selected text at once, and each adjustment is one undo step. A named text style (the Inspector’s Style row) carries them too, so “Panel body, justified, 1.4 line height” becomes one click on every label in the figure — and editing the style restyles every text linked to it.
Cascade
Select several things and press Ctrl+Shift+C: the cascade popover applies a stepped delta across the selection — each object offset a bit more than the last. Pick the property (position, rotation, opacity, size, stroke width, font size, or a colour), the step (add or multiply), and the ordering (selection, layers, left→right, top→bottom); colours ramp perceptually in OKLCh (ΔL/ΔC/ΔH per step). The preview is live; Enter applies as one undo step, Escape puts everything back. Fanned annotations, graded palettes, staircase layouts — one gesture.
Reusable designs
Ctrl+P opens your preset library — a personal, machine-global collection of styled shapes, arrows, callouts, and whole groups (a badge, a labelled bracket), organized in folders, inserted with a click. Save anything from the F menu’s save as preset; a group preset arrives as one unit you can move as one or ungroup.